Nebraskaland Magazine
Fall flowers are in full bloom in the wild places and in our gardens, the cicadas have ceased their droning in the trees while late nectaring bumble bees and butterflies are still active on fall favorites like asters, tall sedums and goldenrods. Not too far around the corner are much cooler temperatures and late fall garden clean up. After a frost there will be leaves to rake, grasses and perennials to cut back and downed limbs to pick up left lying around from summer storms.
Before all of this good organic matter goes to the compost bin or ”yikes” to the trash, do something wild with it, at least temporarily.
What about building a “debris” hut? Anyone (or is it just me) who even watches a little bit of television should be aware of shows like the Canadian produced “Survivor Man” where in each episode the host is dropped off alone in a wild place and is forced to, well, survive. A cold Canadian night in the woods requires shelter and building an insulating debris hut is the answer.
Building a debris hut is a good way of getting the whole family outside to enjoy the great fall weather and in on fall garden clean-up without mentioning the word “work.” The idea is a little like Tom Sawyer tricking other kids into helping him whitewash a picket fence by convincing them that it is so much fun he really hates to share the work.
With enthusiasm, gather the gang together (you can always borrow the neighbor’s kids) and select a place out of the way to construct your hut. You might not want to place the hut on your best turf area so that the turf doesn’t get damaged from too much foot traffic or smothered by the hut itself. Especially since you will want to leave it and live in it through the winter! A few simple tools, those used commonly for yard work (fun) are all that is needed; a small hand saw for cutting branches to size, a leaf rake and a hand operated hedge shear for cutting back grasses and perennials. Oh, and some jute twine used for tying up branch bundles.
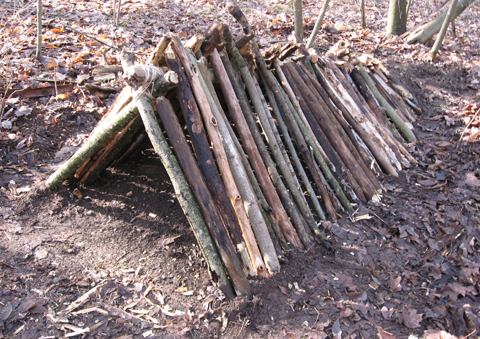
Start by picking up those storm downed branches and limbs and building the frame (the pictures included will help explain all of this) by setting a ridge pole (stout limb) on a tall stump or by creating an “X” with two limbs of equal length and tying them together at the top with twine and then placing a third limb (the ridge pole) with one end of it set in the “X”and extending a little past it and the other end resting on the ground. If you choose the “X” frame method the bases of the crossed limbs can be dug into the soil a bit for stability and the ridge pole also tied to the “X”. Always keep in mind that the frame will need to be sturdy and support the weight of the debris covering and should not be made of weak rotted limbs. The size of your hut is dependent on the size/length of your materials at hand. You will want it large enough to crawl into. Now begin setting smaller limbs along the ridge pole like the ribs of an animal. These will support the next layer.
After the frame is complete begin covering it with “cut back “materials from the perennial garden. These are the taller, coarse perennial stems and grasses. Distribute these materials evenly over the outside of the entire frame. The final step is the pleasure of raking all those fallen leaves and piling them on top of the brushy first layer of grasses and perennial stems. Your finished hut should look like a leaf pile with an opening at one end. You now have a completed warm debris hut to survive in and all of that yard “fun” is completed, at least until the neighbors leaves blow into your yard.